Free WordPress cookie plugin from CCM19
- Main features of the CCM19 WordPress cookie plugin
- How to set up your cookie banner using the CCM19 WordPress plugin
- Step-by-step guide: Setting up the cookie plugin in WordPress
- Step 2: Install the WordPress cookie plugin from CCM19
- Step 3: Add the embed code in the CCM19 Cookie Consent plugin
- FAQs - Frequently asked questions about the WordPress cookie plugin from CCM19
If you have a WordPress website, you are obliged to inform your visitors about non-essential cookies.
How can you ensure that your website complies with the strict requirements of the General Data Protection Regulation (GDPR) while overcoming the technical challenges?
The free WordPress cookie plugin in conjunction with the CCM19 tool offers an elegant solution.
With the CCM19 cookie plugin, you can easily and quickly adapt your website to the data protection requirements of the European Union.
In this article, we will show you how you can create a GDPR-compliant cookie banner for WordPress free of charge in just a few simple steps.
Main features of the CCM19 WordPress cookie plugin
The free WordPress plugin from CCM19 allows you to set up legally compliant cookie banners on websites. It is important to note that the cookie banner is created outside of WordPress. This approach sets the plugin apart from other WordPress plugins on the market.
CCM19 is a user-friendly cookie consent manager that can be used by both users with and without coding knowledge.
Here are some of the key features of the CCM19 plugin:
- Legally compliant WordPress cookie banners: meets the requirements of the GDPR.
- Easy configuration: Provides an innovative solution that simplifies the management of cookie notices
- User-friendly and transparent: Supports the collection and management of user consents in a transparent manner
- Intuitive usability for your visitors: Ideal for webmasters and website owners who value compliance and user experience.
- Highly customizable: Easily adapts to the specific needs of your website. You can customize the look of the cookie banner to match your WordPress theme.
Unlike other cookie plugins for WordPress, the Consent Banner is not configured directly in the backend of a WordPress site, but via the CCM19 dashboard.
After completing the configuration of the banner, you will receive a script code. This should be inserted in the head section of your WordPress website so that the cookie banner loads correctly and is displayed immediately when the website is visited.
Note for users with advanced WordPress knowledge:
It is not absolutely necessary to use our plugin to integrate the generated code into WordPress. Many themes and other plugins also allow you to insert code into the head area of your website. If you use a child theme, you can also integrate the CCM19 script there. However, we only recommend this to experienced users who are very familiar with the handling of WordPress themes.
How to set up your cookie banner using the CCM19 WordPress plugin
Before we get to our detailed step-by-step guide, we will briefly introduce you to the complete setup process.
To set up a cookie banner in your WordPress website with CCM19 in a legally compliant way, go through these three steps:
- Complete the onboarding process in CCM19:
Register for the free plan on the CCM19 platform and go through an automatic scan of your website to find out which services and plugins use cookies. After completing the onboarding process, you will receive a specific code snippet. You insert this into the <head> area of your WordPress page with the help of our WordPress plugin. - Install the WordPress cookie plugin from CCM19:
Download the CCM19 plugin from the WordPress plugin directory and install it. - Integrate code snippet:
Insert the code snippet into your website using our plugin.
Detailed instructions for each step follow to provide you with comprehensive support during implementation.
Step-by-step guide: Setting up the cookie plugin in WordPress
Step 1: Onboarding and initial configuration
Register here for the free plan, which is permanently free of charge.
Enter your domain:
After your first login to CCM19, a screen will appear.
- Enter the domain of your WordPress website in the field.
- To start the scan for cookies and scripts, confirm the security notice displayed.
- Click the green button to initiate the process.
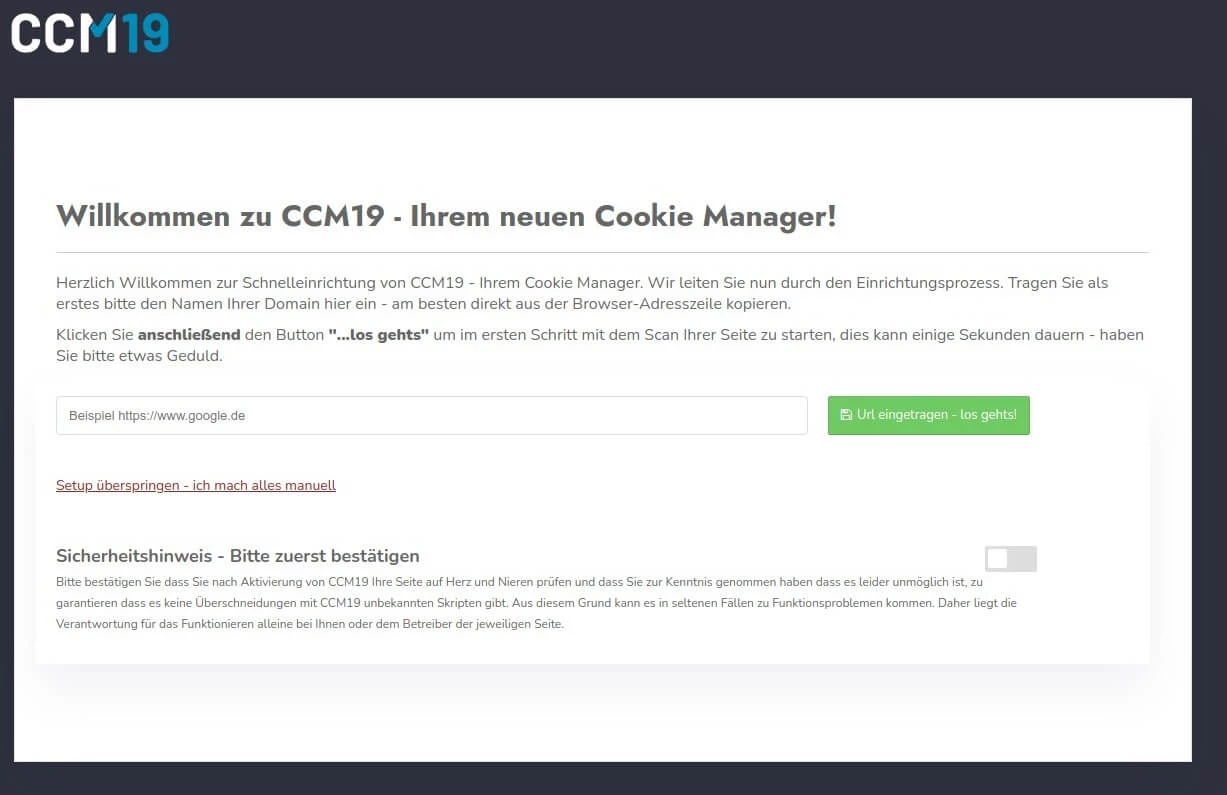
- Manual setup option:
If you prefer a more individual configuration, the system also offers the option of skipping the automatic setup.
You can make all settings yourself via the "Skip setup - I do everything manually" link.
Checking the scan results
Once the scan is complete, the system presents an overview of all WordPress plugins, scripts and cookies found. An entry is created for each resource found, listing the specific cookies and storage elements. Check whether all relevant services have been found.
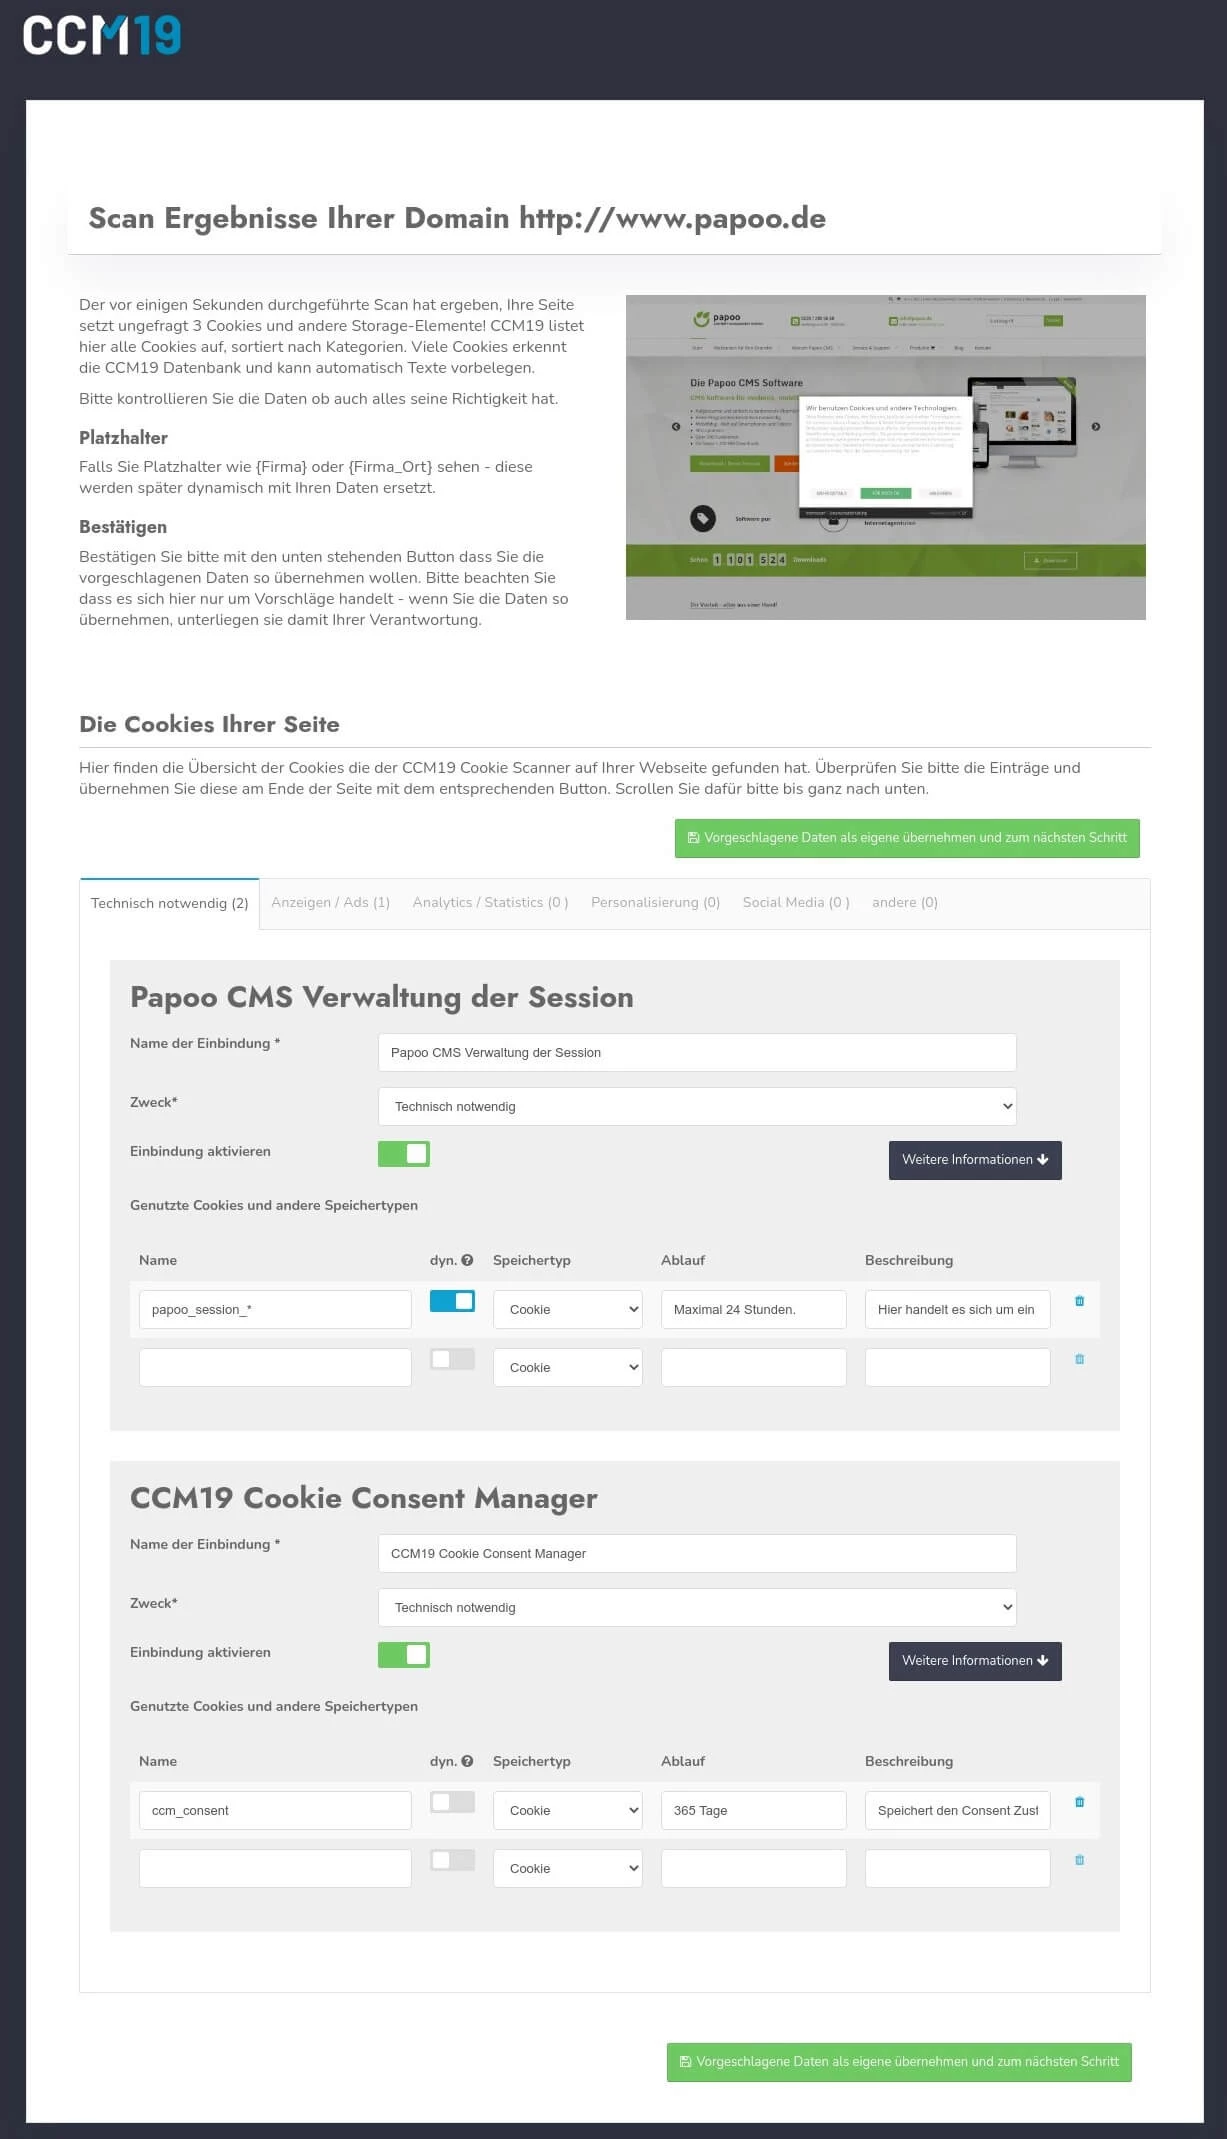
- Now click on the green button "Accept suggested data as your own and go to the next step"
Check imprint and data protection pages
The CCM19 system uses the analyses of your website carried out in advance to automatically identify the links to your legal notice and privacy policy. If these links are correctly identified, the system inserts them directly into the corresponding fields in the setup process.
Please check whether the correct links have been recognized. If the correct links were not found by the system, please enter the correct URL of the pages.
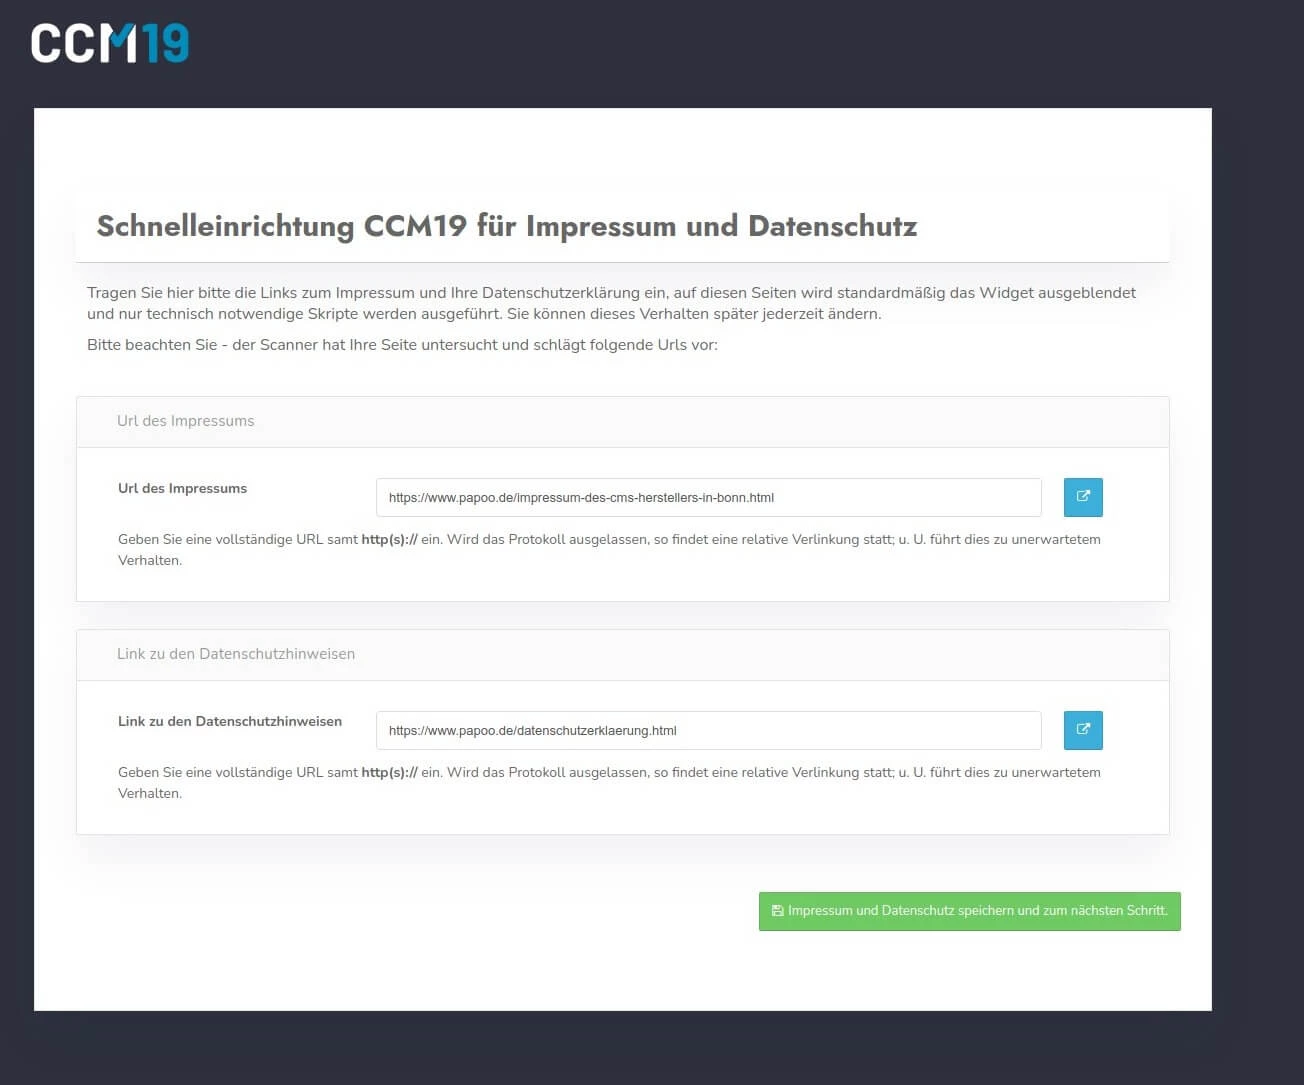
- Now click on the green button "Save imprint and data protection and go to next step" to proceed to the next step.
Customization of placeholder texts
When setting up your cookie banner, you have the option of defining specific placeholders for your website that automatically insert essential company information:
- {FIRMA}: Enter the name of your company.
- {Firma_Datenschutz}add the link to your privacy policy.
- {Firma_Ort}enter the location of your company.
- Confirm the correct entry by clicking on the green button to continue.
Last step of onboarding: Embed code for your website is generated
At the end of the onboarding process in CCM19, you will receive the necessary embed code for your WordPress website.
Next, this code must be embedded in the head section of your website.
- Please copy the embed code, it will be placed directly on your WordPress installation.
Step 2: Install the WordPress cookie plugin from CCM19
Once you have received the embed code from CCM19, the next important step is to install the WordPress plugin.
This special plugin developed for WordPress is free of charge and enables the seamless integration of the CCM19 Cookie Consent Manager into your WordPress website. Perform the installation and activate the plugin to be able to use the embed code.
- Log in to WordPress
Log in to the backend of your WordPress website as usual - Install plugin
Navigate to the "Plugins" menu item in the dashboard of your WordPress site and select "Install".
Enter "CCM19" in the search bar at the top right to find the required "CCM19 Integration" plugin directly.
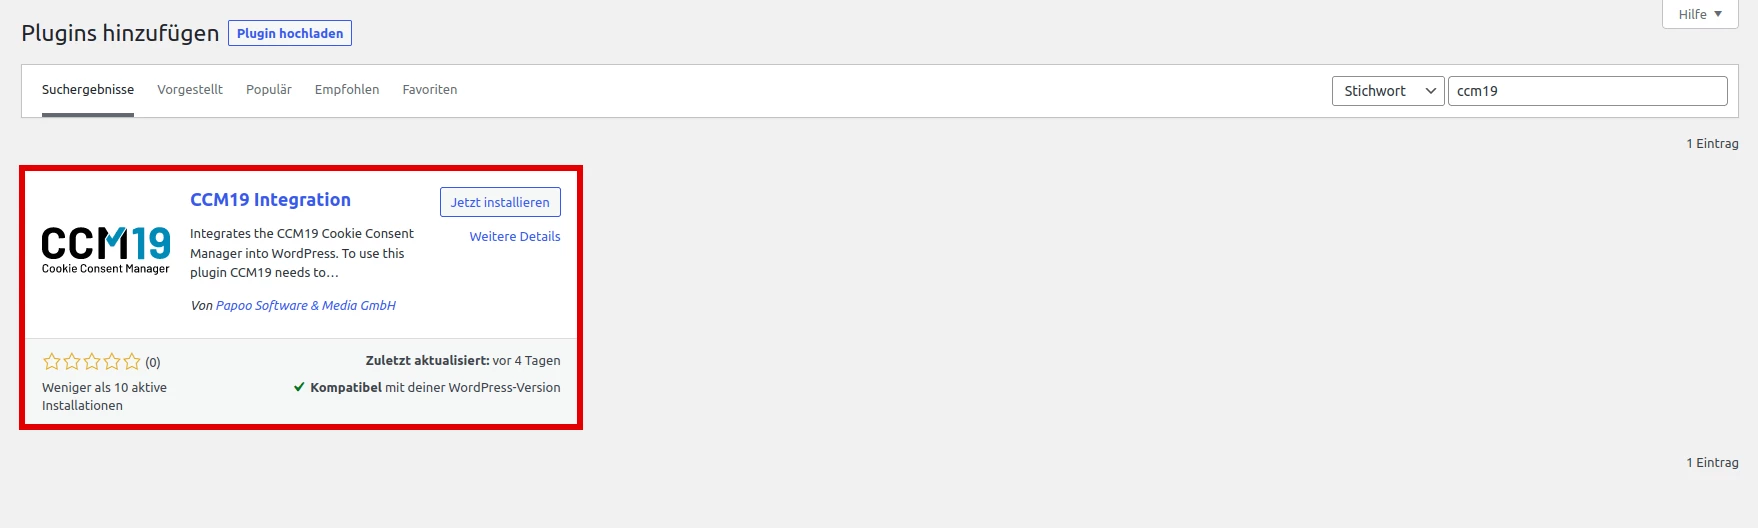
- Click on "Install now".
- Then activate the plugin.
Step 3: Add the embed code in the CCM19 Cookie Consent plugin
- After you have installed and activated the plugin, you will now find the menu item "CCM19 Cookie Consent" under the settings in the left menu of your WordPress interface.
- Navigate to this option to insert the code snippet you received earlier. You copied this code from onboarding or the CCM19 dashboard.
- Paste it into the field provided and confirm the changes by clicking on "Save changes". This completes the setup of the cookie plugin on your website. The cookie banner will now appear on your WordPress site.
With the successful setup and activation of the CCM19 WordPress cookie plugin, your WordPress website is now able to obtain and display cookie consents from your visitors in accordance with data protection regulations.
FAQs - Frequently asked questions about the WordPress cookie plugin from CCM19
Free WordPress cookie plugin from CCM19
- Main features of the CCM19 WordPress cookie plugin
- How to set up your cookie banner using the CCM19 WordPress plugin
- Step-by-step guide: Setting up the cookie plugin in WordPress
- Step 2: Install the WordPress cookie plugin from CCM19
- Step 3: Add the embed code in the CCM19 Cookie Consent plugin
- FAQs - Frequently asked questions about the WordPress cookie plugin from CCM19
- Main features of the CCM19 WordPress cookie plugin
- How to set up your cookie banner using the CCM19 WordPress plugin
- Step-by-step guide: Setting up the cookie plugin in WordPress
- Step 2: Install the WordPress cookie plugin from CCM19
- Step 3: Add the embed code in the CCM19 Cookie Consent plugin
- FAQs - Frequently asked questions about the WordPress cookie plugin from CCM19
If you have a WordPress website, you are obliged to inform your visitors about non-essential cookies.
How can you ensure that your website complies with the strict requirements of the General Data Protection Regulation (GDPR ) while overcoming the technical challenges?
The free WordPress cookie plugin in conjunction with the CCM19 tool offers an elegant solution.
With the CCM19 cookie plugin, you can easily and quickly adapt your website to the data protection requirements of the European Union.
In this article, we will show you how you can create a GDPR-compliant cookie banner for WordPress free of charge in just a few simple steps.
Main features of the CCM19 WordPress cookie plugin
The free WordPress plugin from CCM19 allows you to set up legally compliant cookie banners on websites. It is important to note that the cookie banner is created outside of WordPress. This approach sets the plugin apart from other WordPress plugins on the market.
CCM19 is a user-friendly cookie consent manager that can be used by both users with and without coding knowledge.
Here are some of the key features of the CCM19 plugin:
- Legally compliant WordPress cookie banners: meets the requirements of the GDPR.
- Easy configuration: Provides an innovative solution that simplifies the management of cookie notices
- User-friendly and transparent: Supports the collection and management of user consents in a transparent manner
- Intuitive usability for your visitors: Ideal for webmasters and website owners who value compliance and user experience.
- Highly customizable: Easily adapts to the specific needs of your website. You can customize the look of the cookie banner to match your WordPress theme.
Unlike other cookie plugins for WordPress, the Consent Banner is not configured directly in the backend of a WordPress site, but via the CCM19 dashboard.
After completing the configuration of the banner, you will receive a script code. This should be inserted in the head section of your WordPress website so that the cookie banner loads correctly and is displayed immediately when the website is visited.
Note for users with advanced WordPress knowledge:
It is not absolutely necessary to use our plugin to integrate the generated code into WordPress. Many themes and other plugins also allow you to insert code into the head area of your website. If you use a child theme, you can also integrate the CCM19 script there. However, we only recommend this to experienced users who are very familiar with the handling of WordPress themes.
How to set up your cookie banner using the CCM19 WordPress plugin
Before we get to our detailed step-by-step guide, we will briefly introduce you to the complete setup process.
To set up a cookie banner in your WordPress website with CCM19 in a legally compliant way, go through these three steps:
- Complete the onboarding process in CCM19:
Register for the free plan on the CCM19 platform and go through an automatic scan of your website to find out which services and plugins use cookies. After completing the onboarding process, you will receive a specific code snippet. You insert this into the <head> area of your WordPress page with the help of our WordPress plugin. - Install the WordPress cookie plugin from CCM19:
Download the CCM19 plugin from the WordPress plugin directory and install it. - Integrate code snippet:
Insert the code snippet into your website using our plugin.
Detailed instructions for each step follow to provide you with comprehensive support during implementation.
Step-by-step guide: Setting up the cookie plugin in WordPress
Step 1: Onboarding and initial configuration
Register here for the free plan, which is permanently free of charge.
Enter your domain:
After your first login to CCM19, a screen will appear.
- Enter the domain of your WordPress website in the field.
- To start the scan for cookies and scripts, confirm the security notice displayed.
- Click the green button to initiate the process.
- Manual setup option:
If you prefer a more individual configuration, the system also offers the option of skipping the automatic setup.
You can make all settings yourself via the "Skip setup - I do everything manually" link.
Checking the scan results
Once the scan is complete, the system presents an overview of all WordPress plugins, scripts and cookies found. An entry is created for each resource found, listing the specific cookies and storage elements. Check whether all relevant services have been found.
- Now click on the green button "Accept suggested data as your own and go to the next step"
Check imprint and data protection pages
The CCM19 system uses the analyses of your website carried out in advance to automatically identify the links to your legal notice and privacy policy. If these links are correctly identified, the system inserts them directly into the corresponding fields in the setup process.
Please check whether the correct links have been recognized. If the correct links were not found by the system, please enter the correct URL of the pages.
- Now click on the green button "Save imprint and data protection and go to next step" to proceed to the next step.
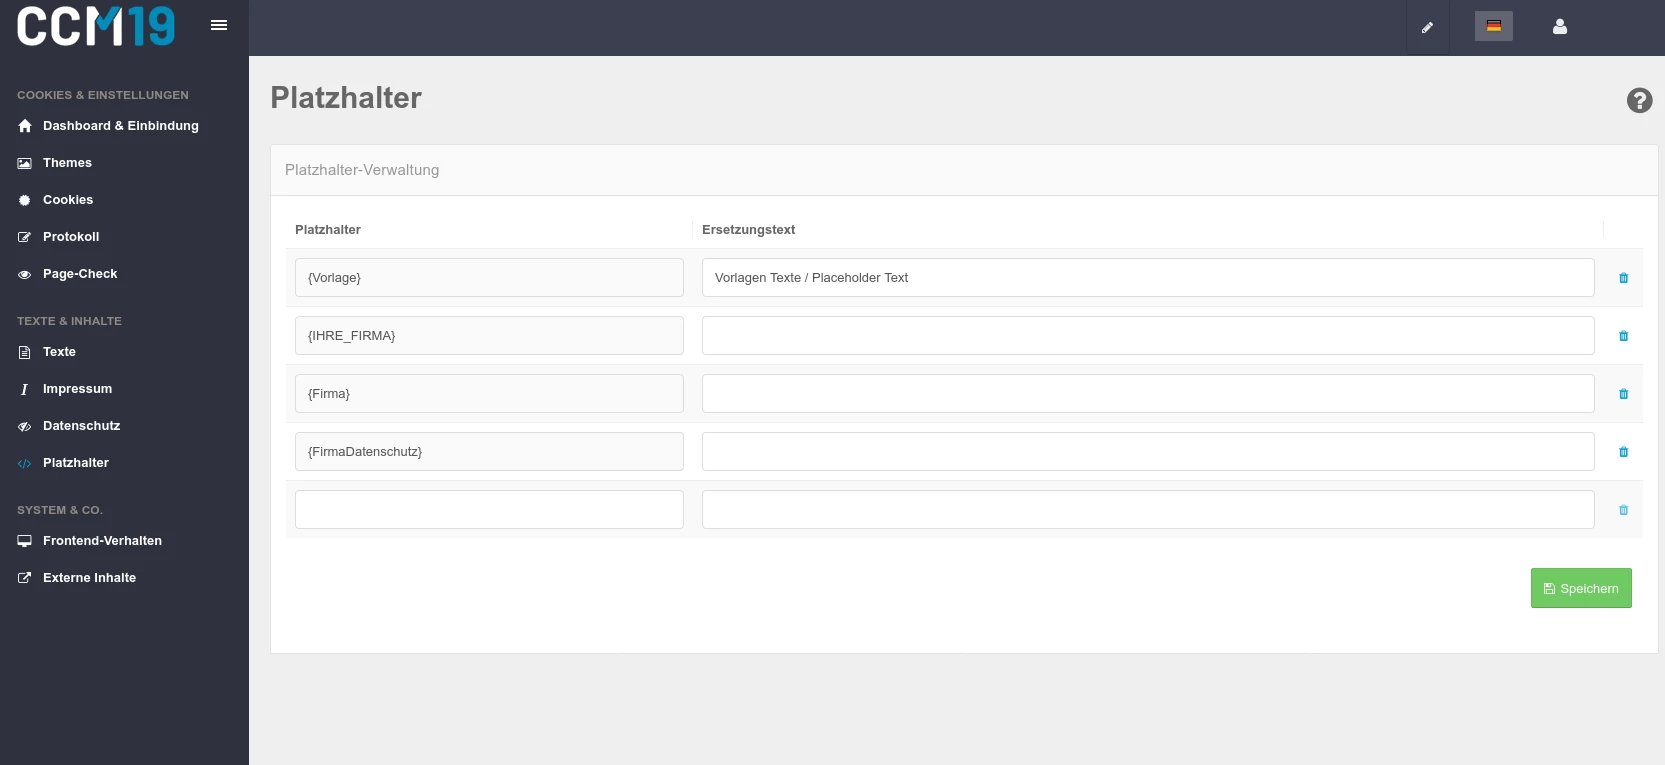
Customization of placeholder texts
When setting up your cookie banner, you have the option of defining specific placeholders for your website that automatically insert essential company information:
- {FIRMA}: Enter the name of your company.
- {Firma_Datenschutz}add the link to your privacy policy.
- {Firma_Ort}enter the location of your company.
- Confirm the correct entry by clicking on the green button to continue.
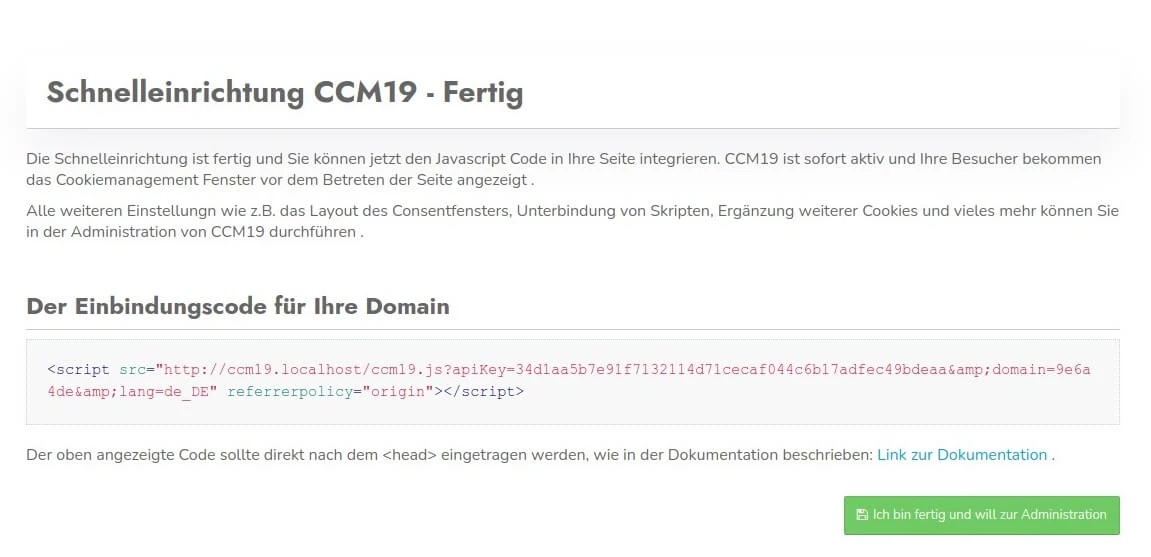
Last step of onboarding: Embed code for your website is generated
At the end of the onboarding process in CCM19, you will receive the necessary embed code for your WordPress website.
Next, this code must be embedded in the head section of your website.
- Please copy the embed code, it will be placed directly on your WordPress installation.
Step 2: Install the WordPress cookie plugin from CCM19
Once you have received the embed code from CCM19, the next important step is to install the WordPress plugin.
This special plugin developed for WordPress is free of charge and enables the seamless integration of the CCM19 Cookie Consent Manager into your WordPress website. Perform the installation and activate the plugin to be able to use the embed code.
- Log in to WordPress
Log in to the backend of your WordPress website as usual - Install plugin
Navigate to the "Plugins" menu item in the dashboard of your WordPress site and select "Install".
Enter "CCM19" in the search bar at the top right to find the required "CCM19 Integration" plugin directly.
- Click on "Install now".
- Then activate the plugin.
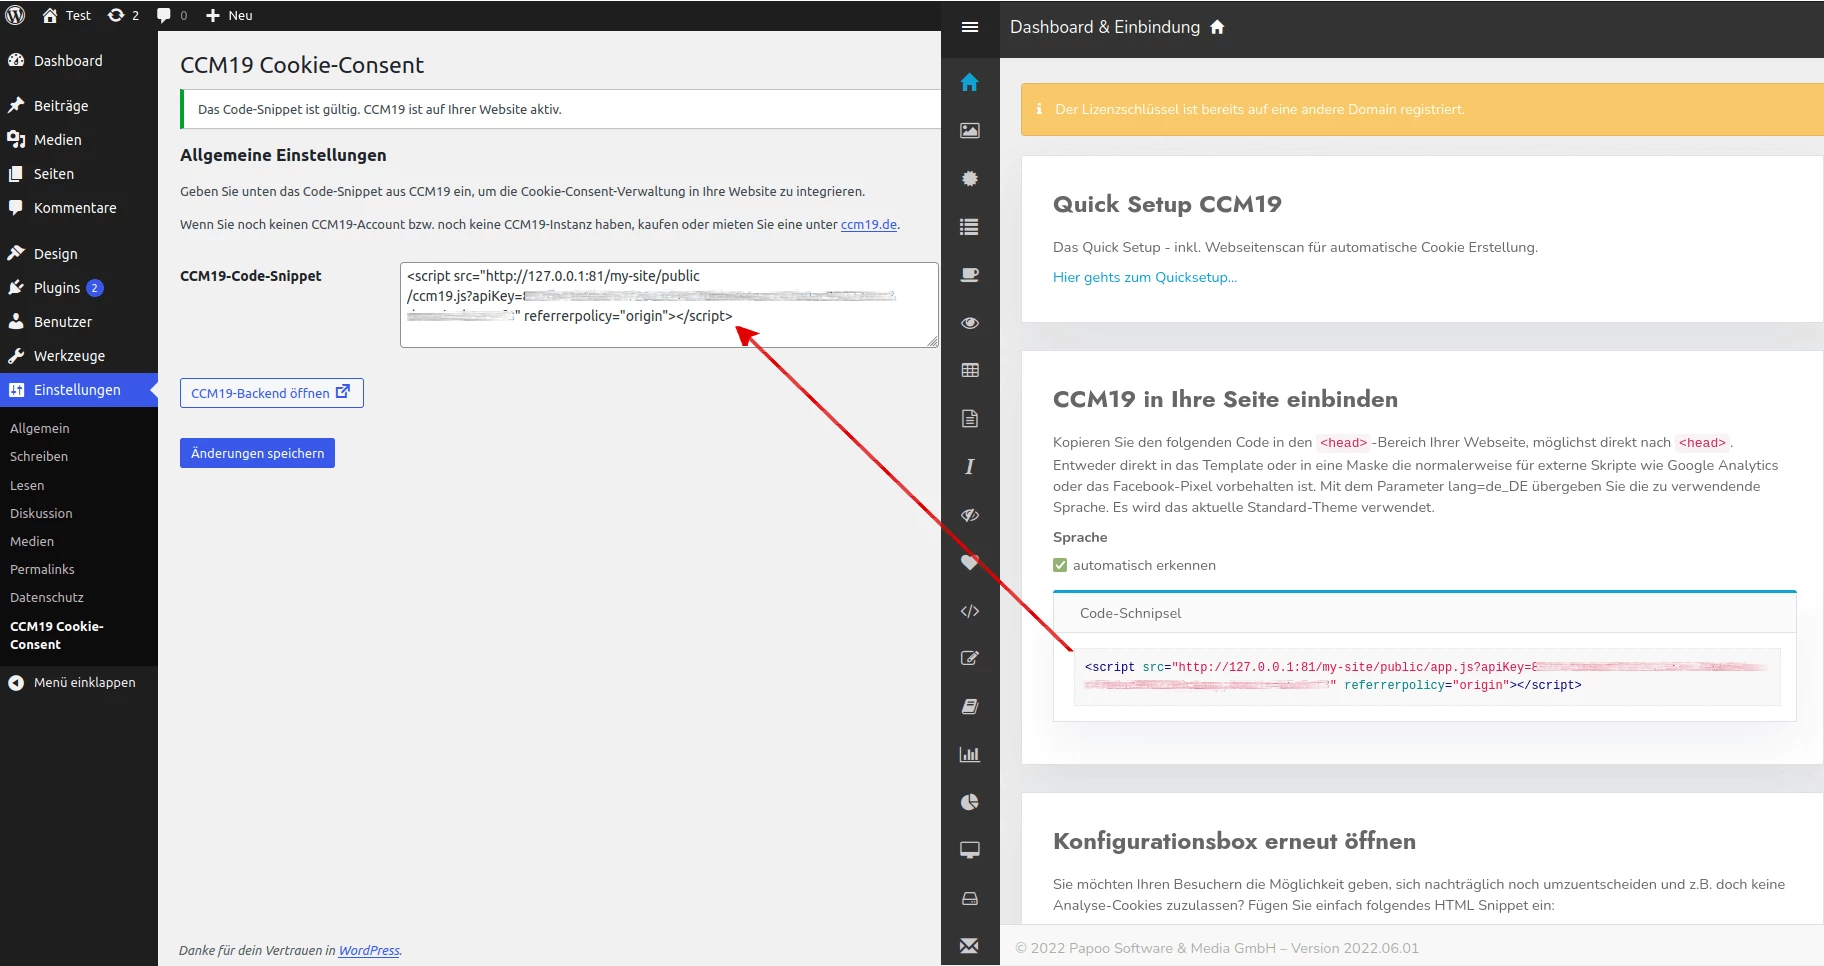
Step 3: Add the embed code in the CCM19 Cookie Consent plugin
- After you have installed and activated the plugin, you will now find the menu item "CCM19 Cookie Consent" under the settings in the left menu of your WordPress interface.
- Navigate to this option to insert the code snippet you received earlier. You copied this code from onboarding or the CCM19 dashboard.
- Paste it into the field provided and confirm the changes by clicking on "Save changes". This completes the setup of the cookie plugin on your website. The cookie banner will now appear on your WordPress site.
With the successful setup and activation of the CCM19 WordPress cookie plugin, your WordPress website is now able to obtain and display cookie consents from your visitors in accordance with data protection regulations.